Atari Home Computer and Peripherals User Guide
Note: This guide is formatted for HTML-capable Markdown renderers. Color-coded warnings and safety notices require an HTML-compatible viewer.
For the lucky inheritor of this classic system
Version 2.0 – Rewritten for clarity and ease of use
Welcome! If you've inherited this Atari setup, you're holding a piece of computing history that's still full of surprises. This guide will walk you through everything step by step, assuming you're new to vintage computers. We'll cover setup, operation, troubleshooting basics, and ways to explore further. This is antique equipment, so please read it fully before powering it on to avoid mishaps.
Let's get your Atari humming again!
Table of Contents
- Foreword
- Introduction
- A Brief History
- Important Safety Information
- About This Specific System
- System Setup
- Operating the Atari
- ATR8000 (Standard Drive, Epson LQ-500, A/B Switchbox)
- Bulletin Board Systems
- Exploring Further
- Final Thoughts
- Appendix A: Glossary of Terms
Foreword
This guide is dedicated to computer enthusiasts who enjoy exploring and learning from the past. The Atari 400 and its myriad peripherals and options make this more than a vintage device — it is a gateway to understanding how personal computing evolved and how creativity flourished within technical limits.
Introduction
If you are reading this guide, you have inherited an Atari 400 computer along with a collection of peripherals, software, manuals, magazines, and notes collected over many years.
You may be asking:
- Why keep this?
- What can I do with it?
- Is it still useful?
This guide is designed to answer those questions and serve as your starting point—no prior expertise needed. It provides:
- A clear overview of the system
- Historical context
- Setup instructions
- Basic operating procedures
- Direction for further exploration
Please read this guide completely before powering on any equipment. Improper operation—especially inserting cartridges or connecting devices while the system is powered on—can permanently damage the system.
This guide contains words related to computers that you may not be familiar with. A glossary is included in the appendix for reference.
The Atari is simple yet expandable. It sparked careers in programming and hardware design. Treat it gently, and it may do the same for you.
A Brief History
Early Personal Computing
Understanding the Atari's roots makes its software and quirks more fun.
Computing in the 1970s–1980s
- Early computers were massive and expensive (e.g., those for the Apollo moon missions).
- Home computers started as kits for hobbyists who built them, like the Apple I.
- Atari released the Atari 400 in 1979—a colorful, game-friendly home computer with custom graphics chips.
- Rivals included Commodore, TRS-80, and Apple II. Each had unique software—no cross-compatibility.
- Pre-internet: Software came via stores, friends' copies, typing from magazines, or BBS (Bulletin Board Systems) via slow 300 baud modems (dial-up over phone lines).
Your Atari's Story
This Atari 400 started as a gift in the early 1980s. It began with 16K of RAM (16 kilobytes of random access memory) and no peripherals. Upgrades include: - MOSAIC Memory Board: Boosts RAM to 48K. - Custom composite video mod: For sharper output (metal top black box with DB-25 connector). - Pull-out keyboard: From an Atari 1200XL, connects via ribbon cable. - INDUS GT Disk Drive: Includes an add-on Z80 card. - Atari 1050 Disk Drive: Includes an Archiver upgrade. - ATR8000: Upgraded to 64K of RAM.
Note: Both the original membrane keyboard and the custom keyboard can operate simultaneously.
There's also an unconnected Atari 800XL for 64K-only software (e.g., The Eidolon).
Life Before the Internet
Software was obtained in four primary ways:
- Purchased from a computer store
- Copied from a friend (if copy protection allowed)
- Typed in from magazines
- Downloaded via Bulletin Board Systems (BBS) using a modem
Early modems operated at 300 baud. Later speeds increased to 1200 and 2400 baud. Connections were made over telephone lines, often incurring long-distance charges.
Important Safety Information
⚠️ Critical Guidelines
- Never insert or remove cartridges while the computer is powered on.
- Never connect or disconnect joysticks or peripherals while powered on.
- Always power peripherals first, then the computer.
- Power off in reverse order: computer first, then peripherals.
- Ensure all SIO connections are properly seated before powering on.
Failure to follow these precautions may cause permanent hardware damage.
Plastic Discoloration
The beige plastic may have darkened over time. This is due to bromine in the plastic reacting to sunlight, not cigarette smoke.
Avoid: - Direct sunlight exposure - Chemical whitening treatments such as Retr0bright, which can cause brittleness
Note: Use protective covers when the system is not in use to slow discoloration.
About This Specific System
Here are your core components for setup. Not everything is needed at once — start simple.
| Image | Component | Description | Connection Notes |
|---|---|---|---|
 |
Amdek Color Composite Monitor | Display for sharp video. | Composite cable from mod box. |
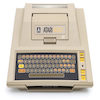 |
Atari 400 Computer | Main unit (48K RAM, custom keyboard). | RF or composite out; SIO chain. † |
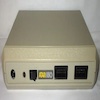
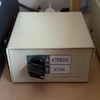
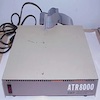 |
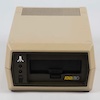
ATR8000 | CP/M co-processor (Z80 CPU). | SIO; uses Atari as a terminal. |
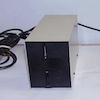 |
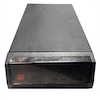
Standard Drive | Boots Atari/ATR8000/CP/M disks. | Drive 1 (via ATR8000) |
 |
Indus GT Disk Drive | High-capacity (Drive 1). | SIO chain † |
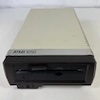 |
Atari 1050 Disk Drive | High-capacity (Drive 2). | SIO chain † |
 |
Atari 810 Disk Drive | Standard capacity (Drive 3). | SIO chain † |
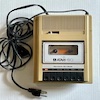 |
Atari 410 Cassette Recorder | Tape storage (end-of-chain). | SIO (one port only). |
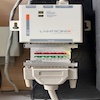
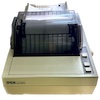 |
Epson LQ-500 Printer | 24-pin near-letter quality. | Parallel via 850/ATR8000. |
 |
Atari 1025 Printer | 8-pin dot matrix. | SIO chain |
 |
Atari 1027 Printer | Letter quality. | SIO chain † |
 |
Atari 850 Interface | RS232/parallel adapter. | SIO; passthrough when off. † |
 |
A/B Switchbox for Modem | Switches modem access. | RS232 to 850 and ATR8000. |
 |
Lantronix UDS-10 Modem | For BBS/Telnet. | Ethernet-to-serial. † |
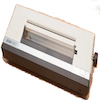
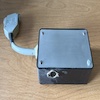 |
Video Out Box | Custom Composite Video Output | Connects to back of Atari 400. |
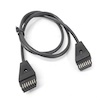 |
SIO Cable | 13-pin Serial Input/Output | Standard Atari peripheral connection. |
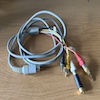 |
Custom Video Cable | Grey cable with Audio (red) and Video (yellow) outputs | Used with Video Out Box and Amdek monitor. |
† = Requires a device-specific power adaptor, which should be included.
System Setup
Peripheral Connections (SIO)
The Atari uses a serial daisy-chain system via the SIO (Serial Input/Output) port on the right side of the computer.
- The connector is keyed (trapezoidal), so cables can only be inserted in the correct orientation.
- Most peripherals have two SIO ports for chaining.
- Devices with only one SIO port (e.g., Atari 410 cassette) must be last in the chain.
Disk Drive Configuration
The system supports up to four disk drives:
- Drive 1 (D1:)
- Drive 2 (D2:)
- Drive 3 (D3:)
- Drive 4 (D4:)
Important Notes
- Drive 1 is always the boot (startup) drive.
- Each active drive must have a unique number.
- The method for setting a drive number varies by model (refer to that drive’s documentation).
Current configuration:
- Indus GT = Drive 1
- Atari 1050 = Drive 2
- Standard Drive (with ATR8000) = Drive 1
⚠️ Do not power on both the Indus GT Drive and the Standard Drive simultaneously, as both are configured as Drive 1.
Power-On and Power-Off Procedures
Proper power sequencing is essential to avoid hardware damage and configuration conflicts.
General Rule
Peripherals must be powered on before the computer. If a device is turned on after the computer boots, it may not be recognized.
Correct Startup Order
- Turn on all peripherals you intend to use.
- Turn on the computer last.
Correct Shutdown Order
- Turn off the computer first.
- Turn off peripherals afterward.
The same rule applies to: - Joysticks - Trackballs - Any device connected to the front joystick ports
These devices should be connected before powering on and disconnected only after powering off.
Cartridge and Controller Safety
⚠️ Never insert or remove a cartridge while the computer is powered on. Doing so can cause severe and permanent damage.
Always: 1. Turn off the computer. 2. Open the cartridge slot door on the top of the computer. 3. Fully insert or remove the cartridge. 4. Close the cartridge door. 5. Turn the computer on.
Operating the Atari
This section covers starting and using the Atari computer, including loading software from cartridges, disks, and cassette tapes. Handle all components gently to avoid damage. Ensure cables are securely connected before powering on.
The Atari computer connects to a monitor for display. Optional peripherals include an external keyboard, joystick, or drives. If issues occur, verify connections and refer to "Troubleshooting" under "Booting from the Disk Drive."
Loading a Cartridge
- Connect the Video Out Box to the video connector on the back of the Atari computer.
- Connect the Amdek Color Monitor to the Video Out Box using the Custom Video Cable.
- (Optional) Attach the external keyboard.
- (Optional) Attach a joystick or other controller.
- Follow the steps in the "Cartridge and Controller Safety" section to insert a cartridge.
- Turn on the Amdek Monitor.
- Turn on the Atari computer.
If successful, the cartridge's contents appear on the screen (e.g., a BASIC cartridge shows a "READY" prompt).
Shutting Down
- Turn off the Atari computer.
- Remove the cartridge and close the door.
If you turn the computer on without a cartridge installed, you'll see the default Atari Computer - Memo Pad screen. Use it to type and test keyboard keys (content is not saved).
Booting from the Disk Drive
⚠️ To avoid damaging the software, DO NOT TOUCH the shiny plastic part of the floppy disk.
Use an Atari DOS disk (e.g., DOS 2.5a or SmartDOS) for this example. Connect the Indus GT Drive via an SIO cable.
- Connect the Indus GT Drive to the Atari computer.
- Turn on the disk drive.
- Orient the disk with the shiny side facing in and the label facing up.
- Insert the disk and close the drive door by turning the lever above where you insert the disk, 90˚ to the right, so the lever is vertical to engage the disk.
- Turn on the Atari computer.
If successful, a menu of disk operations (e.g., copy, load, save) appears.
Note: To eject the disk when finished, turn the lever 90˚ to the left.
Troubleshooting
- Verify the drive’s number switch matches D1: (or D2:, etc.).
- Try a known-good disk.
- Listen for unusual drive noises—power off and clean or service if squeaking.
- Use a different disk drive for Drive 1. (Change the device assignment on the back of the drive.)
Booting from a Cassette Tape
The Atari 410 cassette recorder loads software from standard cassette tapes. Use a known-good cassette for this example (e.g., "Renaissance" from UMI — green text, blue dot under "R" on Side A).
- Press the STOP/EJ button to open the door.
- Insert the cassette with the blue dot facing up and the inner yellow tape visible to you.
- With the tape inserted, push the cassette door down to close it.
- (Optional) Reset the tape counter to "000" by pressing the black button.
- Push the PLAY button down until it clicks and stays in place.
- Hold the yellow Start button on the Atari computer while turning it on.
- The computer will beep once to alert you to remove your finger from the Start button.
- Press the RETURN key to load.
Loading completes when the software (e.g., Renaissance game) appears. Loading may take several minutes.
⚠️ Store cassettes and floppy disks away from magnets, heat, and direct sunlight.
Using the BASIC Cartridge and Software
Some software requires that the BASIC cartridge be installed first. Files with a .BAS suffix on floppy disks require BASIC. The Atari language cassettes, Conversational Spanish and German, also require the BASIC cartridge. You can boot from a DOS disk or a cassette with the BASIC cartridge installed.
For information on loading, printing, and I/O commands in BASIC, refer to "Section 5 Input/Output Commands and Devices" of the Atari 400/800 BASIC Reference Manual (in the glossy black Atari 400/800 Personal Computer binder).
Atari 410 – Data and Voice
The Atari 410 cassette player/recorder uses two-track audio. This means one track can carry data, while the other carries sound. Examples include Atari's Conversational Spanish and German cassette tapes.
Note: Sound from the audio track decreases the farther away the Atari 400 is from the Atari 410 in the setup.
Using Selective Power to Configure the System
Because devices must be powered on before starting the computer, you can control which drives or peripherals the computer recognizes simply by choosing which devices are powered on beforehand.
You can have all three printers connected, six total disk drives, and two devices sharing the same modem.
Example: Using the Atari Disk Drives
🟢 = Powered on | 🔴 = Powered off
To use the Indus GT as Drive 1: - 🟢 Indus GT (Drive 1) - 🔴 Standard Drive — leave powered off
To use the Standard Drive as Drive 1: - 🟢 Standard Drive (Drive 1) - 🔴 Indus GT — leave powered off
With the Atari 1025 and 1027 printers, only one can be powered on at a time when both are connected to the computer. However, because the Epson LQ-500 printer uses the ATR8000 interface, it can be powered on or off with the Atari printers.
Note: Some devices, such as the Atari 410, do not have a power-on or power-off switch. Some devices, such as the Atari 1025 printer, have a power switch and a data on/off switch.
A/B Switchbox
The A/B Switchbox enables you to share the Lantronix UDS-10 "modem" with both the Atari 400 via the Atari 850 and the ATR8000 without having to swap cables depending on the computer you want to use.
- Connect the Atari 850 Interface (serial interface port 1) to the lower right connector (as you face the back of the device) of the A/B switchbox.
- Connect the modem cable from the ATR8000 to the lower left connector (as you face the back of the device) of the A/B switchbox.
Both devices can be powered on, but only the device selected via the switchbox will be recognized.
ATR8000 (Standard Drive, Epson LQ-500, A/B Switchbox)
The ATR8000 (the beige box with the front power switch) is a separate computer that uses the Atari monitor for display and the Atari keyboard for input. Detailed operation of the ATR8000 is outside the scope of this guide; refer to the ATR8000 Owner's Manual and the ATR8000 CP/M Supplement (SWP, Inc.).
Connections
The following devices connect to the ATR8000 (not directly to the Atari):
- Epson LQ-500 printer
- Standard Drive
- Modem cable to the A/B Switchbox
Ribbon Cable Orientation (Pin 1)
⚠️ Caution: Power off all devices before connecting or disconnecting ribbon cables to avoid damaging the hardware.
Each connection uses a ribbon cable that must be oriented correctly.
- Cable side: Look for a colored stripe (usually red) or a small printed "1" along one edge—this marks Pin 1.
- Connector side: Look for a "1," a small triangle, or a notch on the device's connector that indicates the position of Pin 1.
Align the marked edge of the cable with the Pin 1 indicator on the connector before seating the cable.
Modem Connection
You can connect the ATR8000 modem cable directly to the Lantronix UDS-10 Modem or to the A/B Switchbox to share with the Atari.
Power-On Order
Both the ATR8000 and the Epson LQ-500 must be running before the Atari is powered on; otherwise, the Atari will not be able to print to the Epson printer.
- Turn on the Epson LQ-500.
- Turn on the ATR8000.
- Turn on other peripherals.
- Turn on the computer.
Bulletin Board Systems
Prior to the Internet, Bulletin Board Systems run by System Operators hosted software, had user message boards, email, and some even had libraries of documentation. These systems often had different levels of access, granted by the System Operator, that determined the level of control and access in other areas of the site. These sites were hosted and available over dial-up telephone. Here are the steps to connect to Bulletin Board Systems now hosted over the Internet.
Requirements
- Atari 850 Interface (powered on)
- Lantronix UDS-10 "Modem" (powered on)
- "BobTerm 1.21 with 850 RS232 Handler" disk
- Bulletin Board System Internet Protocol Address (BBS IP Address).
Where Do I Get a BBS IP Address?
As of the writing of this manual, a good website for this is the Telnet BBS Guide.
Look for Atari 8-Bit-specific sites or sites that cater to the Atari 400/800. They may use ATASCII characters, which provide a richer visual experience.
If a site provides only a name, such as mybbs.net, convert it to an IP address using an online DNS-to-IP lookup tool.
Connection Steps
- Power on the display.
- Insert the BobTerm disk in Drive 1.
- Power on the Lantronix UDS-10 with the device connected to the local network via Ethernet.
- (Optional) Power on any other peripherals, such as printers.
- Power on the Atari 400.
- Listen for a long beep, indicating the RS232 handler has loaded.
- Once started, configure the software:
- [B] Baud Rate: Set to 2400.
- [A] Translation: Set to ASCII.
- [D] Duplex: Set to Half.
- Enter Terminal Mode (Return key).
- Enter ATDL (BBS IP number),(Optional Port Number), and press Return to connect.
For example:
ATDL 207.126.94.31,6400
After successfully connecting: - Switch to Full Duplex. - Use ATASCII if supported.
Exploring Further
The system includes:
- Programming languages, both high and low level (BASIC, Pascal, C, Assembly, PILOT)
- Language lessons in Spanish and German
- Multiple DOS versions
- CP/M (via ATR8000)
- Music (including a MIDI interface and software)
- Speech Synthesizer software for text-to-speech
- Atari Lab kits for light and temperature
- Print Shop software for custom cards, banners, and signs
- Paint program and a Koala Graphics Pad
- Utilities
- Games
- ...and more
Learning Resources
Programming
Beginner: - BASIC by Albrecht, Finkel, Brown - Atari 400/800 BASIC Reference Manual
Intermediate: - Student PILOT Reference Guide - Atari Assembler by Inman & Inman - MAC/65 Reference Manual
Advanced: - De Re Atari — A Guide to Effective Programming by Chris Crawford, Lane Winner, Jim Cox, Amy Chen, Jim Dunion, Kathleen Pitta, Bob Fraser, and Gus Makreas
CP/M
- ATR8000 CP/M Supplement
Other Resources
- Older issues of COMPUTE! Magazine, Analog Magazine, and Antic Magazine
Final Thoughts
This Atari 400 represents an era when creativity thrived under technical limits. It can be:
- A nostalgic gaming system
- A programming platform
- A hardware experimentation tool
- A window into computing history
As you can see from this guide, the Atari 400 is a versatile computer capable of quite a lot, including connecting to the Internet! Today, you have far more computing power in the palm of your hand than ever existed when the Atari 400 and this collection were new. However, this computer can teach you the foundations of computing that are still relevant today, on a system that isn't as complicated.
The early home computers rewarded curiosity then, and still do. I used to refer to the subject of learning computers as a sweater's loose thread you pull, which never stops unraveling.
Now the “sweater” is yours. Pull the thread.
Appendix A: Glossary of Terms
ASCII – Standard character encoding system.
ATASCII – Atari’s variant of ASCII.
Baud – Data transmission speed for modems.
BASIC – A beginner programming language commonly used on early home computers.
BBS – Bulletin Board System accessed via modem.
Bit – A single unit of memory, which has a value of 1 or 0 (on or off).
Boot – A "warm boot" is a system reset with power on. A "cold boot" is powering off and on the system.
Byte – Eight Bits of memory.
CP/M – Early operating system, predecessor to MS-DOS.
CPU – Central Processing Unit.
DOS – Disk Operating System.
I/O – Input/Output.
KB (Kilobyte) – 1024 bytes of memory.
Modem – Short for "modulator-demodulator;" a device that transmits and receives data over telephone or network lines.
RAM – Random Access Memory; volatile working memory.
ROM – Read-Only Memory; permanent firmware storage.
RS232 – Serial communication standard.
SIO – Serial Input/Output port used by Atari peripherals.
Z80 – 8-bit microprocessor used in the ATR8000.
6502 – 8-bit microprocessor used in the Atari 400.